Monday, July 29, 2013

Christmas in July

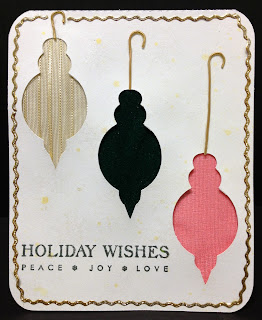
Hi everyone.  This week's card for The Cutting Cafe Design Team is from The Christmas Card Fun files.  When I originally made my card, I used ribbon under the cut out windows.  The whole thing buckled and I was not happy with it at all.  I was going to try doing another card with a different shape, when I found the 3 ornament pieces sitting on my desk.  I decided to do something different and I took the pieces and did some Zentangle on each one.  I pop dotted them onto a die cut, embossed paper.  I attached a little gold string on each one and framed them with a larger, green die cut paper.  I glued the whole thing onto red card stock.

Zentangle card

Original card with ribbon

Check out the other submissions by The Cutting Cafe's wonderful and talented design team.
The Cutting Cafe Blog

Be Blessed!
Until next time...


Sunday, July 21, 2013

Nail Polish Anyone?

Hi.  I'm back again with my newest project from The Cutting Cafe.  Regina is so clever and makes wonderful designs to cut and print!  Today, I made a nail polish shaped card.  There are many great sentiments and it can be used as an invitation.  She even made printable, shaped invites to put inside.  There are even files for a couple of different  nail polish box holders.  Please check them out.

Nail Polish Shaped Card

I cut the image on my Silouhette Portrait.  First I cut out the card shape with white cards stock and then I cut the front piece with designer paper.  Then, I cut out the black top and heart in black and the shadow strip on the top, in white.  I glued the whole thing together and added the elements (flower and bling).  Lastly, I added white dots on the heart and around the bottom of the bottle.  

Be sure to check out the The Cutting Cafe blog and see all of the wonderful projects that the design team cooked up for you!

Until next time...

Saturday, July 20, 2013

Another Design Team!

Hi everyone.  It has been a couple of weeks since I was able to post on my blog.  I have been out of town.  I am pleased to announce that I have been chosen to be on another design team.  The name of the company is Imagine That Digis by Kris.  I have been doing her progressive challenge since she started doing it a few months ago and now she wants me on her design team.  I am very honored.  I don't actually start until August 1st, but I decided to do this card with the image from the progressive challenge because it was soooo sweet.


I will be back tomorrow with a new project for The Cutting Cafe.

Until next time... 

Thursday, July 11, 2013

Card Box Organizer

I am on vacation right now and have been trying to post my latest creation for The Cutting Cafe.  We were to make either a Card Box Organizer Set or The Dresser Box Template.  Due to my time constraints, I decided to go the easy way and make the card box.  I really like the way it turned out.  I used 2 pieces of 12x12 designer card stock for this project.  After putting it together, I added some ribbon, silk flowers and leaves and also a vine from a MFT die.  Easy peasy!
Box & Lid

Top of Box

I won't be able to have anything for next week, due to my being away, but I will return with my next project in 2 weeks.


Until next time...

Monday, July 1, 2013

The Cutting Cafe - Butterfly, Fluttering By

Can you believe it?  July is already here!  I am trying to get ahead of the DT game by making my projects in advance.  Then when I get really busy, I will already have the next project ready.  Sounds good, huh?  Problem with that...I already am busy!  I actually started on next week's project, but for now we will show this week's finished card.  This week's files from The Cutting Cafe is a butterfly theme.  We could do either a butterfly treat box or a butterfly folded card.  That is what I decided to do.  I cut out the pieces and used a plain card stock for the card base and a matching designer paper for the topper.  I added some glitzy stickers on the body and the antennae, put 2 black rhinestones on the head (for the eyes) and made white dots around the head and antennae and eyes.  I added 4 white flowers in the corners and put stickers in the center of them, also.  I used a Viva Decor pearl pen to put dots on the outline of the shape and used a glitter pen on the swirls on the designer paper.  To finish it off, I tied pieces of purple and black ribbon and glued them to the body. 

 butterfly shaped card

Close-up of card (you can see the details here)

Be sure to check out all of the other designers, here.  They have some wonderful projects to show you.    If you leave a message for each designer, you could win sets from the The Cutting Cafe shop.

Don't forget to leave your comments for the designers (including me)!

Have a great week!

Till next time...